

Thank you, Aimee!
What you will need:
Fabric
Pattern (the pattern used in the tutorial can be downloaded via Aimee's blog)
Various embroidery supplies
Wax based crayons
White paper
An iron.
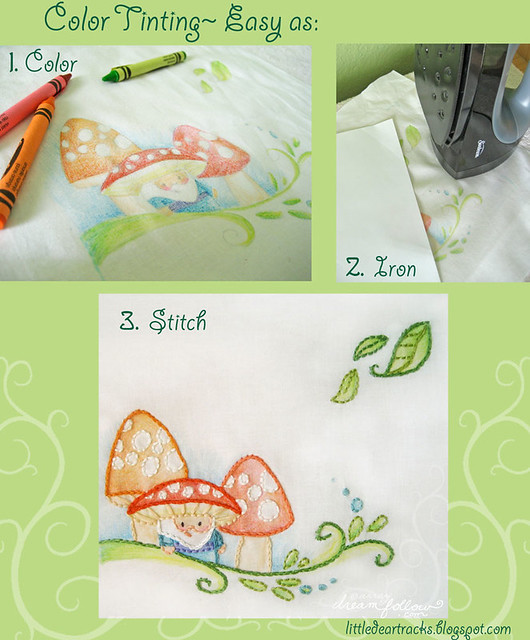
Step 1.
Transfer your pattern to fabric. I used a plain pencil and light table for mine this time. Now get out your crayons! Place your fabric onto a hard surface and LIGHTLY begin filling in spaces with color. Get creative! your project will look great if you add a little blending. Start with the lightest color and blend in darker shades around the edges.
For instance, on my leaves I filled them in with a light yellow green, then added a medium/darker green at the edges, then a tiny bit of aqua blue at the tips. It is important to not press too hard, but just use very light strokes. You can go back and make your colors darker if you want to, after step 2.
Step 2.
When you're done coloring, place your fabric on a towel or ironing board and the paper on top of it. Iron over the paper on the hottest setting. This will set the color into the fabric, and also remove any access wax. Iron for a few minutes, until no more wax is being released onto the paper.
Step 3.
Embroider your lines any way you like! I like to use floss that is a shade or two darker than the colored area it is outlining. When you're done you'll have a unique embroidery piece you can frame, use in a quilt, or use however you like.
If you stitch up the free pattern, please add your photos to the Doodle Stitching flickr group!
I hope you enjoy this fun little project! ~ Aimee
This tutorial was orignally posted on Aimee's blog.
What are you stitching? Please share in the &Stitches Flickr group. We'd love to see it!
This gnome is so cute! I've done a bit of crayon coloring for embroidery and love how it gives more dimension to the piece. I think it makes it look much more whimsical! Thanks for the link!
ReplyDelete